Qualcomm mới đây đã công bố top ba đội chiến thắng vòng chung kết mùa giải đầu tiên của Cuộc thi Thử thách... Xem tiếp
Bạn đang ở đây
Kỳ công vẽ 5 mẫu nail siêu đẹp cho Halloween
Thứ tư, 23/10/2013 - 3:14 pm
![](/sites/inlook.jufist.org/files/remote/407bffe844cf6a7a97ed47886d752c4d.jpg)
people like INLOOK.VN fanpage
Làm 5 bộ móng này khá kỳ công, nhưng nếu chịu khó một chút, bạn sẽ có những bộ móng đẹp và độc đáo.
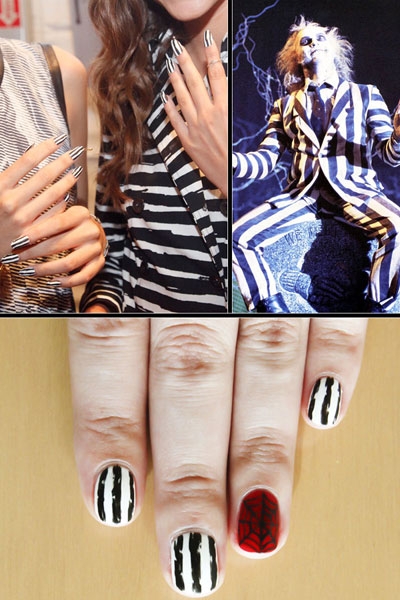
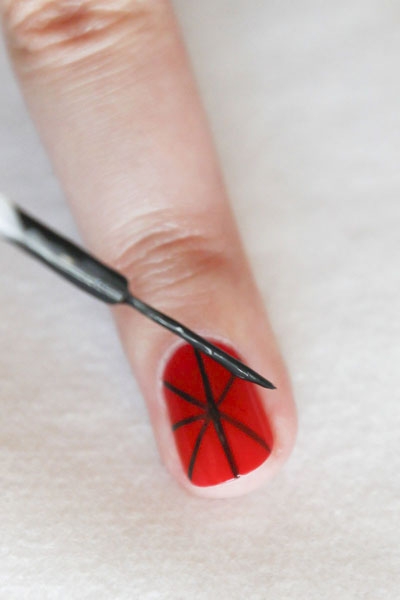
1. Nail kẻ sọc đen
![](/sites/inlook.jufist.org/files/remote/a7c9301caa7ac261055b70c4a83e47e7.jpg)
Sản phẩm hoàn chỉnh.
![](/sites/inlook.jufist.org/files/remote/7846b1aab2813db0e4efaee711e11663.jpg)
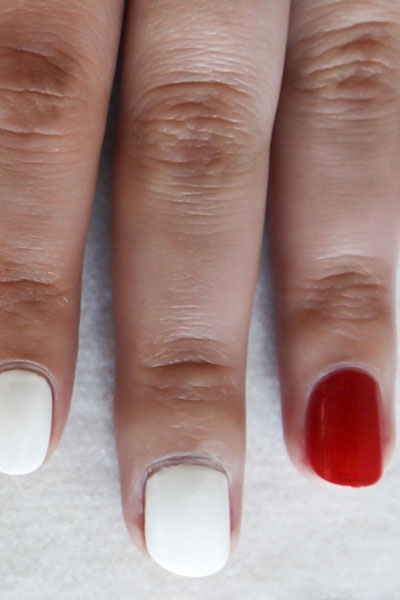
Bước 1: đánh màu nền trắng và đỏ.
![](/sites/inlook.jufist.org/files/remote/e2cd10c4dde68ba5f9325ca6a8ee4552.jpg)
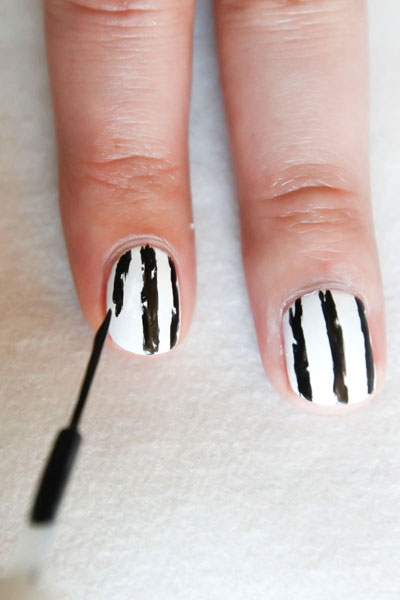
Bước 2: Đánh kẻ sọc đen.
Bước 3: Vẽ móng đối xứng.
![](/sites/inlook.jufist.org/files/remote/26a5e5e2a556b9346cdc5a84d27d3435.jpg)
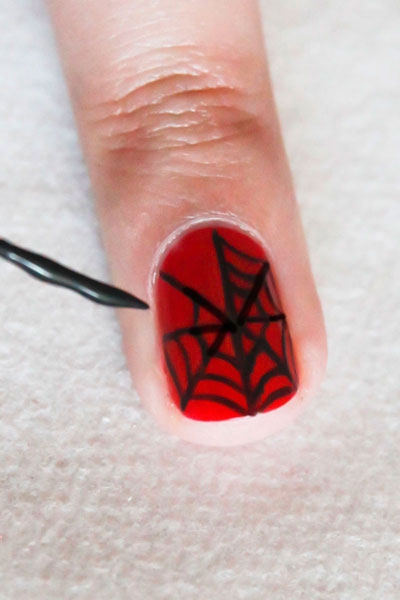
Bước 4: Vẽ mạng nhện.
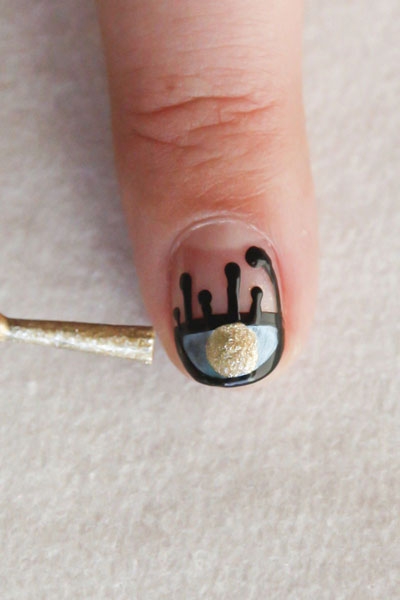
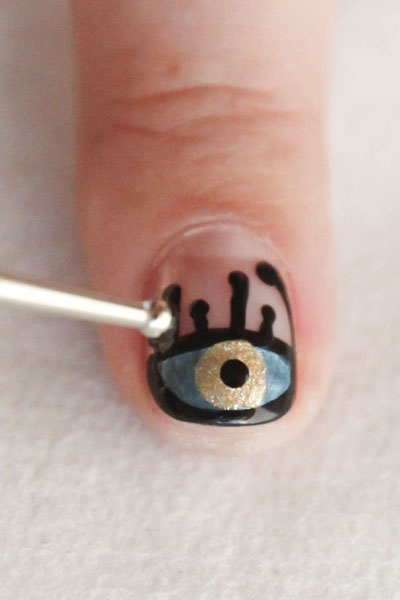
2. Móng tay thuốc độc
![](/sites/inlook.jufist.org/files/remote/935a69158f7cfeb336484aa14d885421.jpg)
Sản phẩm hoàn chỉnh.
![](/sites/inlook.jufist.org/files/remote/8d13902c8502ba0889db213c0c43b06e.jpg)
Bước 1: đánh nền màu trắng.
![](/sites/inlook.jufist.org/files/remote/a7a7be59ddc9d0c390c468a4d2b8d094.jpg)
Bước 2: đánh thêm chút nhũ bóng.
![](/sites/inlook.jufist.org/files/remote/654269237662d2100f37b228df6c7db6.jpg)
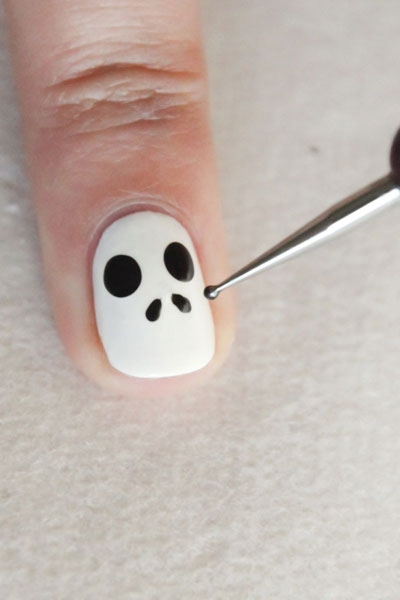
Bước 3: Đánh hai mắt đen.
![](/sites/inlook.jufist.org/files/remote/a0cd34ce06c4897adb807e6e3cee0641.jpg)
Bước 4: Làm hai lỗi mũi.
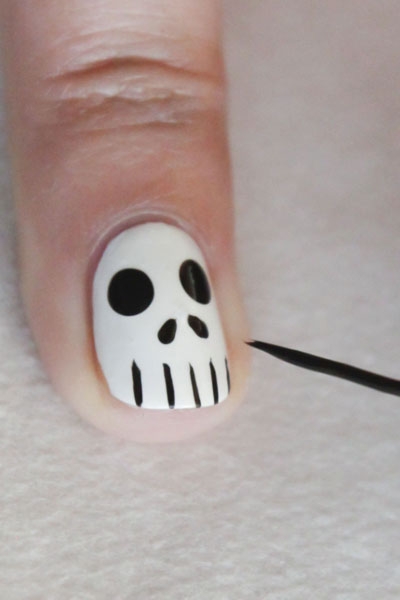
![](/sites/inlook.jufist.org/files/remote/80dfef501c006ebe086b839f24d9fce0.jpg)
Bước 5: Làm râu.
![](/sites/inlook.jufist.org/files/remote/665671a53317f1209440862c01cc55a8.jpg)
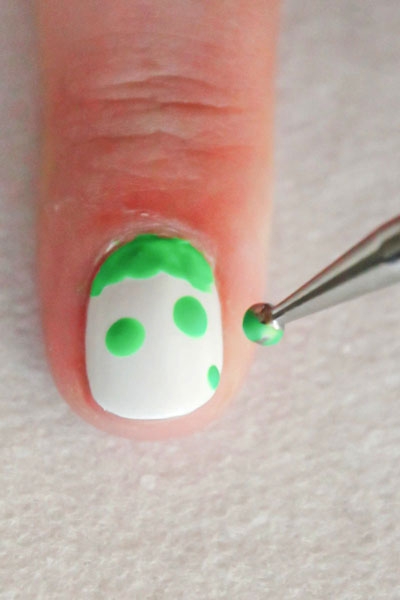
Bước 6: Đánh nhũ xanh chân móng.
![](/sites/inlook.jufist.org/files/remote/daa87f30868a0c13262600e65404b860.jpg)
Bước 7: Đánh hai mắt màu xanh.
![](/sites/inlook.jufist.org/files/remote/028c855f1b8055f37da7a525e0d948ae.jpg)
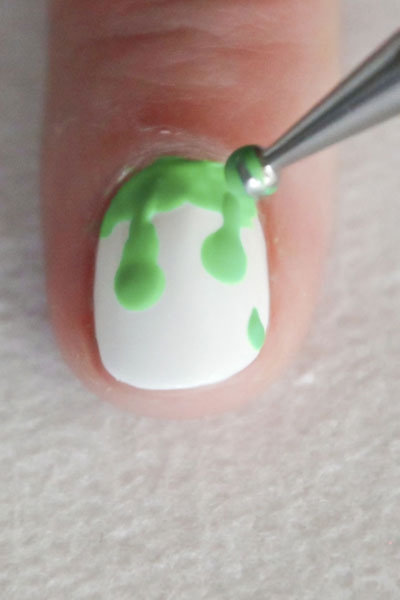
Bước 8: Kéo dài hai mắt nối với phần nhũ xanh chân móng.
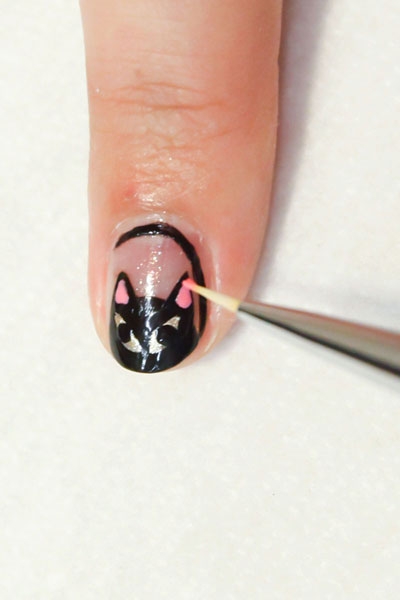
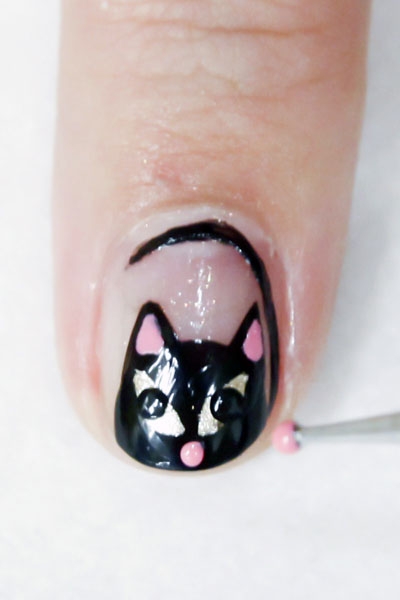
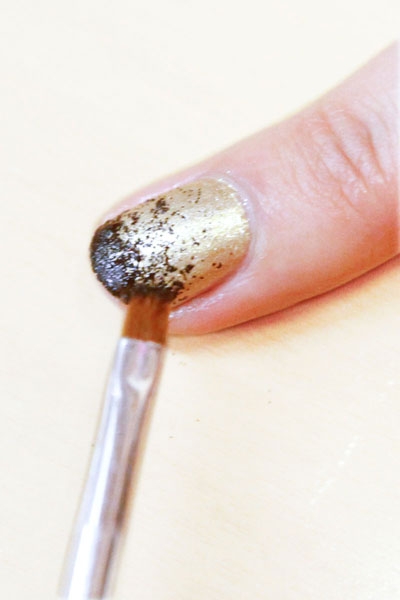
3. Mèo kitty màu salem
![](/sites/inlook.jufist.org/files/remote/95d2a90b997d2fe5c0022433dd18568f.jpg)
Sản phẩm hoàn chỉnh.
![](/sites/inlook.jufist.org/files/remote/bd2afeb2466274578cd57dfa69142328.jpg)
Bước 1: Sơn một lớp son bóng, ngón trỏ sơn nhũ lấp lánh.
![](/sites/inlook.jufist.org/files/remote/3326e1ca17ac2e3584d55fc6fd118df8.jpg)
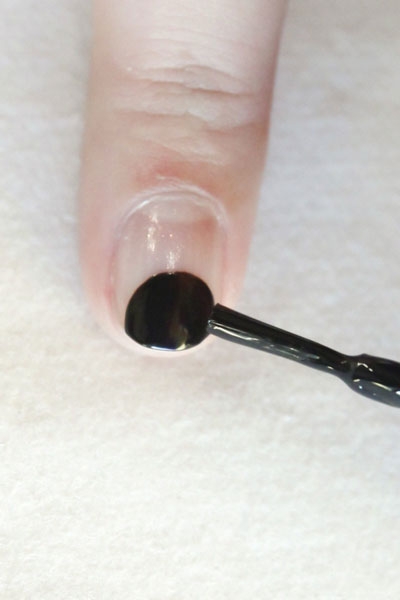
Bước 2: Đánh nhũ đen đầu móng.
![](/sites/inlook.jufist.org/files/remote/7d8d9ad468632c0e434a8e0cf4e487c0.jpg)
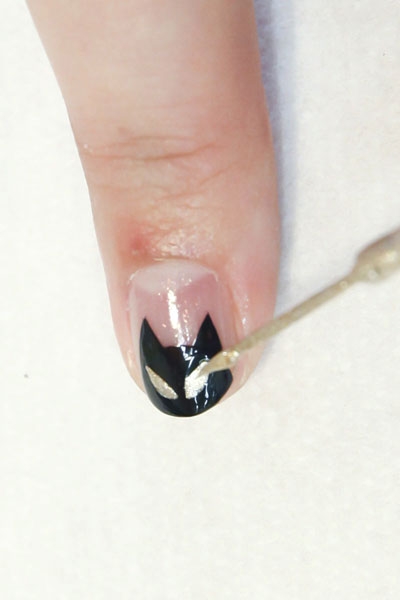
Bước 3: Vẽ tai mèo nhọn hoắt.
![](/sites/inlook.jufist.org/files/remote/d54b96b5d71f9f72723d42f68cbb40c0.jpg)
Bước 4: Vẽ mặt mèo bằng nhũ bạc.
![](/sites/inlook.jufist.org/files/remote/e23f83c06e62340b384356fb561651e6.jpg)
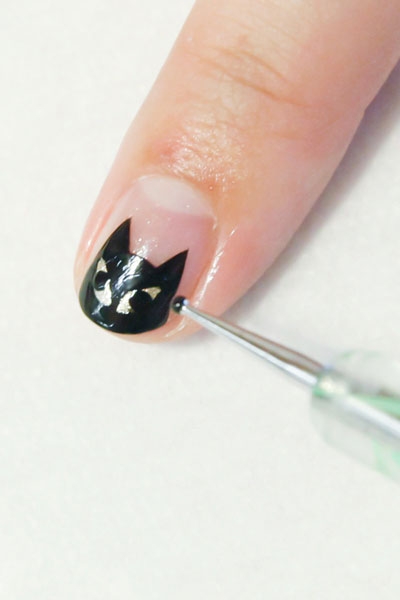
Bước 5: Chấm mặt đen vào đè lên phần nhũ bạc ánh đồng.
![](/sites/inlook.jufist.org/files/remote/a3e7c74622d4cdc5e7ed69282e9d3c38.jpg)
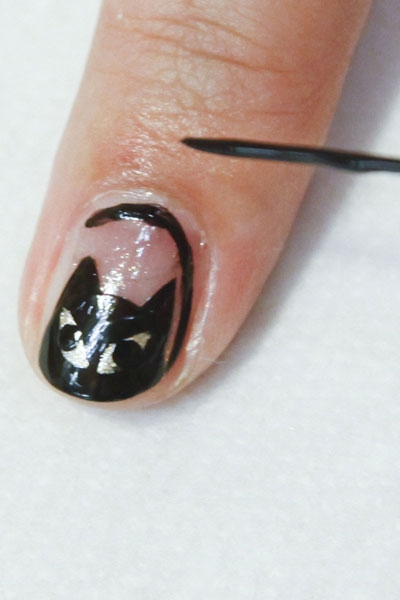
Bước 6: Vẽ đuôi mèo.
![](/sites/inlook.jufist.org/files/remote/04dd6493acc1691614db294029fc32c9.jpg)
Bước 7: Tô tai mèo màu tím.
![](/sites/inlook.jufist.org/files/remote/7737dcdaf4ee28dcbaf65223997cbe14.jpg)
Bước 8: tô tai mèo màu tím.
![](/sites/inlook.jufist.org/files/remote/2698d8f274a592f73e04b1b77e743cde.jpg)
Bước 9: đánh nhũ màu nâu cà phê đè lên lớp nhũ ánh đồng ở ngón trỏ.
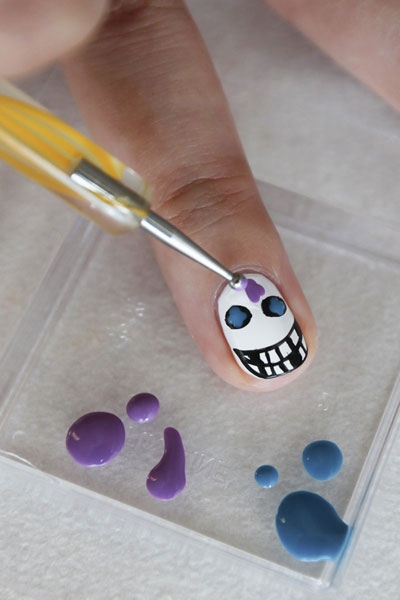
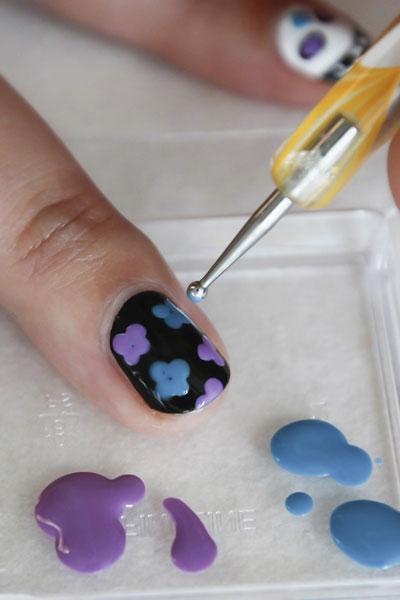
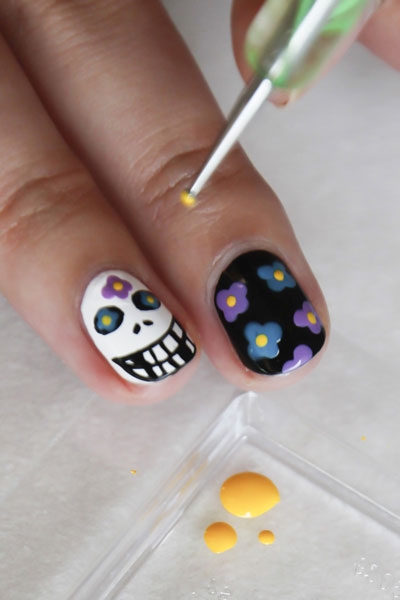
4. Thần chết
![](/sites/inlook.jufist.org/files/remote/5df8eadaf5a4f8816022be01d7fab0fc.jpg)
Sản phẩm hoàn chỉnh.
![](/sites/inlook.jufist.org/files/remote/345f588679b02cfe8f7555978f4de3d2.jpg)
Bước 1: vẽ nền màu trắng và đen cơ bản.
![](/sites/inlook.jufist.org/files/remote/ce2b1967d12a1417057cb380c1501c39.jpg)
Bước 2: vẽ mặt người.
![](/sites/inlook.jufist.org/files/remote/0dd6ce3934669437cefbaec4f12be9db.jpg)
Bước 3: tô sơn tím.
![](/sites/inlook.jufist.org/files/remote/c34633fdf7db6b9599577b8c233077e0.jpg)
Bước 4: Vẽ bông hoa xanh và tím đè lên nền móng màu đen.
![](/sites/inlook.jufist.org/files/remote/7afe6a87cb24dfb462f863819ff63e8a.jpg)
Bước 5: Vẽ nhụy vàng cho bông hoa.
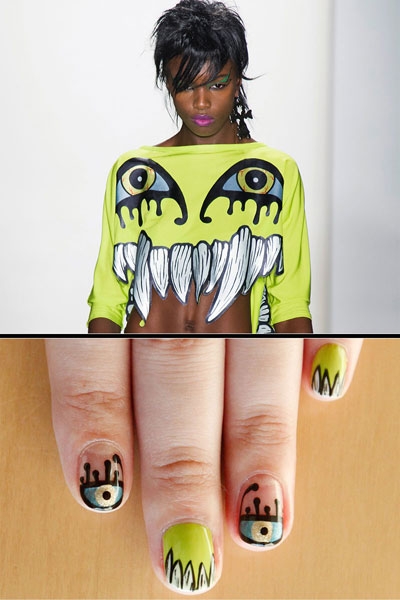
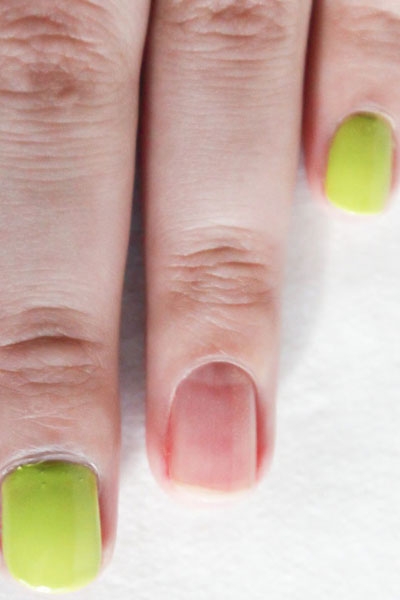
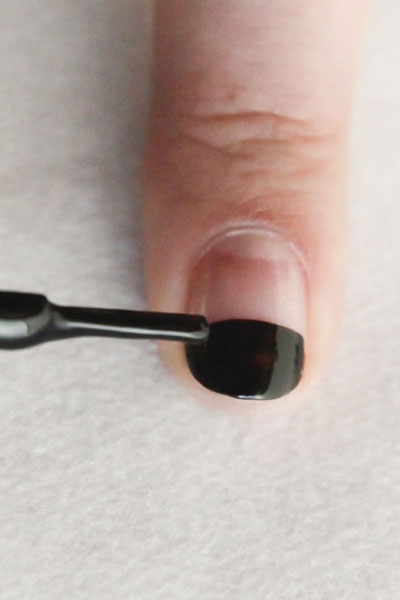
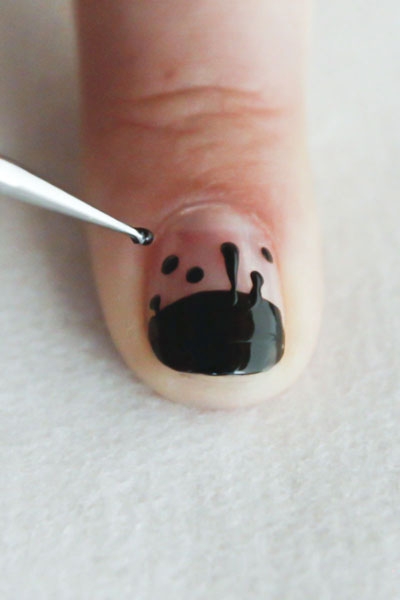
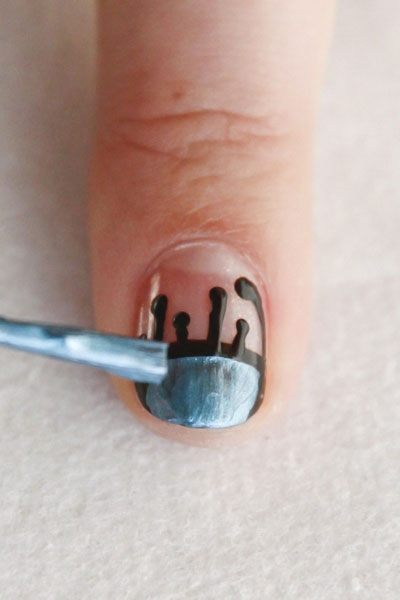
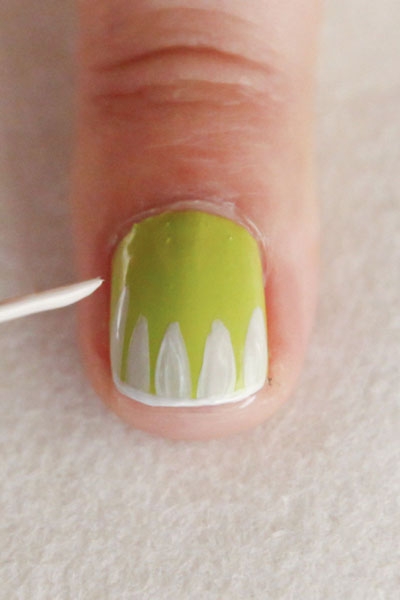
5. Tạo hình monster
![](/sites/inlook.jufist.org/files/remote/9b168d24f25888b41f36a488978bbc39.jpg)
Sản phẩm hoàn chỉnh.
![](/sites/inlook.jufist.org/files/remote/ac4f83b4ba09bd6417a53f17d19fae07.jpg)
Bước 1: vẽ hai móng ngón trỏ và ngón út nền màu xanh cốm, 3 móng còn lại để nguyên.
![](/sites/inlook.jufist.org/files/remote/451a88e937e66fcb15c9e397de1b77fa.jpg)
Bước 2: Vẽ màu đen lên đầu các móng chưa có nền.
![](/sites/inlook.jufist.org/files/remote/241d8eefba2d6411ed56b725c21cef96.jpg)
Bước 4: Vẽ tiếp cách chấm bi màu đen.
![](/sites/inlook.jufist.org/files/remote/16fdc5acde7289061f6880015e1f2219.jpg)
Bước 5: Tiếp tục kéo dài các chấm bi.
![](/sites/inlook.jufist.org/files/remote/9b3db01c52e7e3674c68dfaa409dda90.jpg)
Bước 6: Tô sơn xanh nhũ kim tuyến.
![](/sites/inlook.jufist.org/files/remote/823e13584aa6cdc6e51bca0aa057426d.jpg)
Bước 7: Hoàn thiện hình bán nguyệt màu xanh nhũ kim tuyến.
![](/sites/inlook.jufist.org/files/remote/a14c4fef1db9922b6f7c9df45a10db10.jpg)
Bước 8: Chấm một vòng tròn kim tuyến màu vàng.
![](/sites/inlook.jufist.org/files/remote/50be137da9ebb072476e1344b7ddcc7c.jpg)
Bước 9: Chấm một chấm đen như con mắt.
![](/sites/inlook.jufist.org/files/remote/55e3caaeb29555ee75aceebcf828647c.jpg)
Bước 10: Vẽ răng trắng trên nền màu xanh cốm.
![](/sites/inlook.jufist.org/files/remote/407bffe844cf6a7a97ed47886d752c4d.jpg)
Bước 10: tô viền răng bằng màu đen.
![](/sites/inlook.jufist.org/files/remote/a7c9301caa7ac261055b70c4a83e47e7.jpg)
Theo Xzone